


Installed this in my 30" x 24" deep cabinet above my ovens. I had some junky metal dividers originally installed in my cabinets. Was going to make my own dividers, but found this. Great product that you don't have to make yourself. Just wanted to give you some hints on how to install it. I'm an advanced DIY carpenter, and I'm sure there have been many people who cut these too short in height during installation. Hopefully these instructions will prevent that.
I have an approximately 23.5" deep cabinet. I trimmed the depth of the dividers first, trimmed them to 19.5". I could of made it up to as much as 21". I did this on my table saw.
Once you have them trimmed to depth, figure out the spacing that you want to use in the cabinet, mark it off in the cabinet with a pencil and measure between the markings to ensure you have it right. I didn't the first time around, but it was only pencil marks.
Then you are going to install the top and bottom wood rails. I made spacers for each rail out of scrap wood, one at approximately 5 3/8", 11 3/8", 17 3/8", 23 3/8". Cut the wood rails on a chop saw to proper length, to match the depth of the panel, in my case, 19.5". Remember for the spacers, you'll have to subtract half the width of the wood rail, which I believe is 3/8".
The directions state to use #4 x 1/2" long screws, but I saw a picture from another user that provided a review, and used #6 x 3/4". For this, I had to countersink holes in the wood rails. Countersink the holes, if required, and drill a third one, because you trimmed it to length. I would just use the #4 screws, then you won't have to countersink (or at least I don't think).
Now using the guides from scrap wood, start with the longest one first, place it up against the side of the cabinet and put the rail against it. Secure the first screw. DO NOT OVER DRIVE the screw, it will cause the rail to split. Move the guide to the middle of the rail, insert the next screw, then move it to the back and secure the back screw.
Repeat with the upper rail. This ensures they are exactly above/below each other in the same plane.
Then do the other three rails with the next longest guide.
Now you have to cut the height of the panel. USE THE SCRAP WOOD FROM TRIMMING THE DEPTH of the panel, measure what you think it should be, and set your saw (I have a table saw) and cut the height of the SCRAP panel. Test fit it....is it too short? No big deal, adjust your saw and use the next piece of scrap wood. Get it correct, test fit the scrap wood into the rails in all four locations, then leave your saw at that adjustment and cut the actual panels.
If you want the handle to be the in middle, you'll have to trim half from the top and half from the bottom, so you can't leave the saw in the same position as mentioned above, you'll have to cut the first half of the cut, then adjust it again to get the second half of the cut. Use the scrap piece of wood to set the saw for the second cut.
Measure twice and cut once! Enjoy!
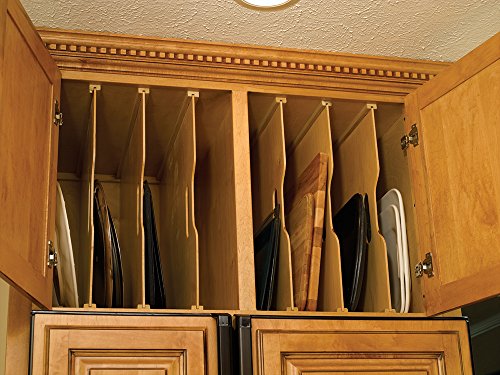
These are high quality, beautiful dividers. Each huge divider has a handle (in case you need to remove them to insert a wider pan or for cleaning, I guess) and a top and bottom guide rail to slide on. We installed 7 individual shelves into a huge, deep cabinet right above our double-oven. Our cabinet depth was slightly less than the length of these so we trimmed the shelves. To avoid any splintering, we taped both sides where we planned to cut and then used a table saw to shorten the shelves. Nothing splintered. Our cabinet was too tall, so we used a nice piece of plywood to make it shorter then in put a piece of decorative trim board to hide the paneling. Wow, the finished product is beautiful. My once useless, too high up, too deep cabinet now holds all my baking pans! We phoned the company once for information and they were very friendly. Our product had no printed directions included but the we did fine anyway. Shipping was fast.
Just ordered and installed these yesterday. They went in very easily and have a nice finished look when completed. One thing I wish they would include the screws needed to complete the installation. You need 24, .5" #4 flathead wood screws, not sure why they didn't just include so you don't have to get that as well. I also had 1 split rail which wasn't too much of problem. These provide a very nice finished look.
They look so professional and perform the job. I no longer have to stack cookie sheets, cutting boards, 9" x 11" baking pans, serving trays, cooling racks, etc..They took some work to install so I gave them one less star.They are huge so I had to cut them to size.
Worked as expected. Customer was pleased with the look and functionality. This item Works better with a frameless cabinet however we installed the tracks on a low profile piece of matching maple to accommodate a framed cabinet.

Feature Product
- Dividers: 23-2/4" W x 23-3/4" H x 3/16" T
- Rails: 3/4" W x 24" L
- 4 dividers and rails included per set
- Made in USA
Description
Omega National "Tra-Sta" maple wood tray dividers. Perfect for cookie sheets and trays. Includes 4 trimmable maple trays and grooved top and bottom rails. Easily trimmable to fit any size cabinet.
Worked great - needed to buy screws that would fit in the wood track for the dividers. Look great once installed.
My wife loves them
After trimming them to fit a custom cabinet, they fit great. It was difficult to screw them in. It would be nice to have pilot holes with a countersink to get the screw heads flush so the dividers are easier to slide in.
Love!
Just as promised

0 comments:
Post a Comment